Thursday, November 03, 2016

How to Access Survey Results in Blackboard

You can access the Survey results by using the drop-down in the header row of the column that represents the survey in the Gradebook.

Instructions:

Find the column for the Survey in Grade Center > Full Grade Center.  Click the arrow that appears when you move your mouse over the column name and choose Attempts Statistics from the drop-down menu.


You will now see the results of your survey on a page.

Note:  Surveys in Blackboard are always anonymous, meaning that you cannot attribute specific answers to specific students.  If you need to create a non-anonymous survey in Blackboard, instructions are here.

We hope this information is helpful.


Thursday, July 07, 2016

How to Add a Librarian to your Blackboard Course

On the Northeastern Blackboard instance, it is now possible to add a librarian to your course to assist with review or editing of your course material.

Librarians may add, edit, and delete course material in your course, but may not remove students or other users from your course, and do not have access to view or edit student grades.

Here's how to add a Librarian to your course/organization:

1.  Go into your course/org site in Blackboard and at the lower left click Users and Groups > Users.


2.  Click Enroll User > Find Users to Enroll.


3.  Click the “Browse” button and search for the person by Last Name or Email.  


If you have trouble finding the person, make sure you are not searching by username.  If a person has a drop in the course, you will not be able to enroll them.  In that case, contact help@neu.edu.


4.  Select "Librarian" from the Role drop-down and click the Submit button.


That's it.  The person you enrolled now has access to your course material.  You may see a list of who is enrolled in the course by clicking Users and Groups > Users > GO


Thursday, January 21, 2016

How to Post a Cloud File Link in Blackboard from OneDrive

The best way make a large file available to your students in Blackboard is to upload it to a cloud service such as OneDrive and then post a link to the file in your course.

Here's how:

1.  In your browser, go to Northeastern's OneDrive instance at Northeastern's OneDrive service is available at northeastern-my.sharepoint.com.  Create a folder there and upload the file you want to host into the folder.

2.  Go to the Northeastern Blackboard site at blackboard.neu.edu and navigate to your course.

3.  Make sure "Edit Mode" is toggled to ON at the upper right


4.  Navigate to the Content Area in which you want to post the file link (e.g. Course Material)

5.  From the "Build Content" menu, select "Upload Cloud Content"


6.  Type a name for your link and select the "OneDrive for Business" cloud service


7.   Select "Link from Cloud"

8.  Click "Browse" to locate your file within OneDrive.  


Proceed to browse to the file you want to post and click the file name.

If this is the first time you have logged into OneDrive, you will need to proceed through the authentication process using your myNEU account, which will return you to step 6.


9.  Click the "Submit" button.  A link to the file will be posted into your Blackboard course


Students can now click your link to view or download the file.

Here is a video showing the process for linking to a video file in OneDrive: http://screencast.com/t/GmX4rPzbcGNg

We hope this is a helpful guide.  Please let us know if you have any questions.


Send Email to Multiple Courses at Once, and Post Content to Multiple Courses at Once in Blackboard

Instructors:

Do you want to post content to several of your course sections at once in Blackboard?

Would you like to send an email message to several of your sections at once?

You can by using the "Multiple Courses" box on the Courses tab in Blackboard.

From there, you can send email to multiple sections, post content or links to multiple sections, even create assignments in several sections simultaneously.


We hope this tip is useful to you.  Please let us know if you have any questions about it.

ATS@neu.edu


.

Thursday, July 02, 2015

Fixing Cookie Settings In Your Browser for Blackboard

Incorrect settings in your browser can cause a number of problems in Blackboard, not limited to:

- Blackboard asking you to log in again when you are in the middle of a session
- Turnitin prompting for log in
- Delays in uploading submissions in Turnitin
- Trouble posting to Blogs, Wikis, or Journals


If you have experienced any of these issues, it may be due to your browser's "cookie" configuration. Here are some fixes to try:


A. Configure your browser to accept cookies


Chrome (recommended for Blackboard)

1. Open Google Chrome and click the Chrome menu () upper-right.
2. Click "Settings"
3. Click "Show Advanced Settings..."
4. Click the "Content Settings..." button.
5. Select "Allow local data to be set".  Make sure "Block third-party cookies" is not checked.
6. Click OK

Allow local data to be set


Firefox (recommended for Blackboard):

1. If the menu bar is not displayed, press and release the ALT key on keyboard to show the menu
2. Click Tools menu / Options / Privacy
3. Select "Remember history" from the "History" section
4.  Click OK


Internet Explorer

1. If the menu bar is not displayed, press and release the ALT key on keyboard to show the menu
2. Click Tools menu / Internet Options / Privacy tab
3. Configure as follows:

Click Advanced
Check Override Automatic cookie handling
Accept First party cookies
Accept Third party cookies
Always allow session cookies

4. Click OK, OK


Safari

1. Click on the Safari-menu in Safari (or Edit menu on Safari for PC).
2. Click on the Preferences... item in the menu.  A new window opens.
3. Click on the Security icon near the top of the window.
4. Under Accept Cookies, select "Always".  If you do not see this setting, continue to the next step.
5.  Click on the "Privacy" icon.
6.  Under "Block Cookies" click "Never".


B. Empty your browser's cache:


C. Upgrade to the latest version of your browser


We hope this information is helpful. Thanks for using Blackboard.


Wednesday, February 11, 2015

How to Create a "Voice Board" in your Blackboard Course

A "Voice Board" is a voice-based threaded discussion that you can create in your Blackboard course.

Here is a video showing how to create a Voice Board in your course:

http://screencast.com/t/65IaXcBbGi
Unable to display content. Adobe Flash is required.


.

Tuesday, February 03, 2015

Have Students Upload Videos for an Assignment

Students can submit videos in response to an Assignment that you have posted in Blackboard.

Here are instructions for students for how to upload a video in response to an Assignment:


Students: 
  1. Go to http://youtube.com and click the "Sign in" box at the upper-right here:  http://screencast.com/t/PHxSveLb
  2. Sign in using your Google or Gmail account (not your myNEU account)
  3. Click the "Upload" button at the top and upload the video as "Unlisted":  http://screencast.com/t/invknsBLT9L
  4. Go to http://blackboard.neu.edu and navigate to your course in Blackboard
  5. Find the Assignment link and click on it
  6. Click the "Write Submission" button:  http://screencast.com/t/naJ5O67Ab
  7. Click the chevron on the right to expand the toolbar:  http://screencast.com/t/zxDT2Vaa
  8. Click the video button on the toolbar that looks like a webcam:  http://screencast.com/t/QPgXjvATNooH
  9. If YouTube thinks you are not signed in, click the "Sign in to Youtube" button: http://screencast.com/t/tlDm7Afx
  10. Remember to use your Google or Gmail account, not your myNEU account credentials
  11. Click the "Accept" button:  http://screencast.com/t/QtXdtdyEXVV1
  12. Click the "Browse" tab and click the "Insert" button for the video:  http://screencast.com/t/ymUyHkGBSV
  13. Click "Insert Link", then click "Insert":  http://screencast.com/t/UrHCt10qMZy
  14. Click the "Submit" button:  http://screencast.com/t/8ZcUnO8PP2


The instructor can view the videos as follows:

Instructor:

As the instructor, you can view the videos and grade by clicking the drop-down in the Full Grade Center cell, then click the Attempt:


 .

Wednesday, January 14, 2015

Blackboard IM isn't listing all of my classes

Blackboard IM is an Instant Messaging client from Blackboard that lists the classes you are enrolled in and lets you chat with your classmates.

You can get Blackboard IM from within your Blackboard course in Tools > Blackboard IM

Once you have Blackboard IM, if your Blackboard IM client is not listing some of your courses, try these steps to fix it.


1.  In Blackboard IM, click the "Blackboard IM" menu, then click exit, like this:


2.  Restart Blackboard IM and log in.  Check the "Classmates" tab.  If your classes are there, you're good.  If not, keep going.

3.  Click the "Blackboard IM" menu, then click "Manage Account", here: 

4.  Log in using your Blackboard IM username and password (which might be different from your myNEU credentials).  If you have trouble, use the forgot password link here:  http://screencast.com/t/Z8F3vrd7


5.  Once you are logged in, under "Course Settings", check the boxes for all of your courses:


6.  Back in Blackboard IM, check the "Classmates" tab.  If your classes are there, you're good.  If not, go back and repeat steps (1) and (2) again.


We hope this information is helpful.


.

Monday, January 05, 2015

How to Embed a Tegrity Video in Blackboard

You can embed a Tegrity recording in a small player in any Content Area in your Blackboard course. Here's how:


1.  Access the Tegrity recording.  

 Select the box next to the date of the video you would like to embed.


2.  Click on Recording Tasks dropdown menu. Then click on Share Recording.


3.  A new window will appear. Uncheck the box Do Not Allow Anonymous Users to View the Recording. This will enable students to view the Tegrity directly from the Blackboard site without having to login to Tegrity again and will provide you with the Embed option.


4.  Now you can copy the Embed code by highlighting it with your mouse, then copying it (right-click copy or CTRL+C (Windows) or Command+C (Mac) on the keyboard).  Then Click OK.

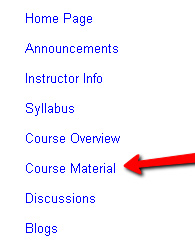
5.  Return to the main page of your Blackboard course and click on the Content Area into which you would like to post your Tegrity recording.


6.  Click on Build Content then click Item.


7.  From here you can enter the Name of the video and type in a Text description if desired.


8.  Next, you will need to access the HTML code editor in order to paste the embed code you copied. To do so, click on the Toggle HTML Source Mode icon in the Text editor toolbar.


9.  Make sure that your mouse cursor is flashing a couple of lines below the text you entered. Then paste in the embed code (right-click paste or CTRL+V on keyboard).


10.  You can also Attach File, such as an associated transcript of the video or PowerPoint file that the video demonstrates. Select the options Permit Users to View this Content (to set link availability), Track Number of Views (to monitor student viewing of the video), and Select Date and Time Restrictions (to set specific dates for the link to appear).


11  When you are finished setting the options, click Submit.


12.  Your new embedded video will appear in your course content area.


13.  Done.  Now you can see how it looks for students by using the Student View option.


.

Friday, October 24, 2014

Columns are missing in the Grade Center and/or you Can't Scroll

If you created a column in the Grade Center of Blackboard, and can't find it, it may be hiding because of your browser zoom settings or your MacOS scrollbar settings.
Try these methods to fix it:

1.  If you're using a Mac, Make sure your Mac preferences are set to display the scroll bars as follows:


a.    Launch System Preferences, either from the Dock or from the Apple menu. b.    Once the System Preferences window opens, select the General preference pane. c.    The middle section of the General preference pane controls when scroll bars appear and a few additional scroll bar options. d.    Select "Always" from the Show Scroll Bars options.


Once your scroll bars are back, use the horizontal scroll to scroll to the right in the Grade Center to find your missing columns.


2.  If you are using Google Chrome, make sure your view zoom is set to 100%Blackboard has a bug where it doesn't display the rightmost column in the Grade Center in Chrome if your zoom is set to anything other than 100%.


3.  The column you're looking for may be hidden.  You can unhide hidden columns by going to the Manage > Column Organization option here:  http://screencast.com/t/MxsDz8vbPL .  Unhide the columns by selecting them and choosing the "unhide selected columns" option at the bottom.


We hope this information is helpful.


.


Thursday, October 23, 2014

How to Sync your Blackboard Calendar to your Outlook Web Mail / Office365 Calendar

You can subscribe to your Blackboard calendar from within Office 365 / Outlook Web Mail.  Below is a video that shows how.  Scroll down for written instructions.

Once you subscribe to your Blackboard calendar from within Outlook, new events in Blackboard will automatically sync to Outlook within an hour or so of being added to your Blackboard courses.

Link to video: http://goo.gl/1spKgx
Unable to display content. Adobe Flash is required.


Instructions:

1.  Go to Blackboard, click the "Home" tab, then click "Calendar"
2.  Use the "Get External Calendar Link" button and copy the link to the clipboard
3.  Go to Office365 at outlook.office365.com.  Log in and click the "Calendar" option.
4.  Right-click the "Other Calendars" link and select "Open Calendar".
5.  Paste the link from Blackboard into the Internet Calendar box and click "Open"

Your Blackboard calendar will be automatically synced to Outlook/Office365 going forward.


How to Sync your Blackboard Calendar to your Google Calendar

You can subscribe to your Blackboard calendar from within Google Calendar.  Below is a video that shows how.  Scroll down for written instructions.

Once you subscribe to your Blackboard calendar from within Google, new events in Blackboard will automatically sync to Google Calendar within an hour or so of being added to your Blackboard courses.

Link to video: http://goo.gl/IMtNLm
Unable to display content. Adobe Flash is required.


Instructions:

1.  Go to Blackboard, click the "Home" tab, then click "Calendar"
2.  Use the "Get External Calendar Link" button and copy the link to the clipboard
3.  Go to Google Calendar at calendar.google.com
4.  Next to "Other Calendars", click the dropdown and select "Add by URL"
5.  Paste the link from Blackboard into the URL box and click "Add Calendar"

Your Blackboard calendar will be automatically synced to Google going forward.


How to Post a Link to a Google Spreadsheet into your Blackboard Course

Google Sheets can be used to allow students in a Blackboard course to edit a spreadsheet collaboratively.

Here's a video showing how to create and post the link in Blackboard:

Link to video: http://goo.gl/EHiW7S
Unable to display content. Adobe Flash is required.

Friday, April 11, 2014

Creating a Non-anonymous Survey in Blackboard


Surveys in Blackboard are anonymous, which means the instructor cannot see which specific student answered a particular way in the survey results.

If you need to create a survey for which you need to attribute specific answers to specific students (a non-anonymous survey), the way to do it in Blackboard is to create a Test and call it a "survey".

To create a non-anonymous survey (Test):

1. Select Course Tools > Tests, Surveys, and Pools from the course management control panel.

2. Select Tests, then Build Test


3. Provide a name, description and student instructions for the non-anonymous survey.  We suggest including the word "Survey" in the name so students will know this is not a test.

4. Next, from the Question Settings page set the Default point value to 0 because this is a survey, not a test, so the questions so have no numeric value.


5. For this example survey, we created one question as an Opinion Scale / Likert question:


6. Since the non-anonymous survey is technically created as a Test, you must select a "correctanswer.  In this example, we select the "Not Applicable" answer as the correct answer.  Since this is a survey, there really is no correct answer, so it does not matter which answer you designate as correct.


7. To deploy the non anonymous survey, set the Make Link Available option to "Yes" and in the "Show test results and feedback to students" section, uncheck the "score per question" checkbox and set only the "Submitted" check box as shown to ensure that the student does not see which answer you designated as the "correct" answer you selected when creating the test:


8. If the survey is already deployed, you can Edit the test options by clicking the drop-down menu to the right of the test link:


9. Here is a video of the entire process.


Tuesday, March 04, 2014

How to print a Blackboard Test Using the Respondus 4.0 Test Creator application

Respondus 4.0 provides an efficient user friendly to print Blackboard Tests.

First download Respondus 4.0 Test Creator.

To print from Respondus 4.0 Test Creator

Retrieval & Reports tab - Select Retrieve questions


Select blackboard.neu.edu and click next


Choose a Course and an Exam and Enter a name for the file


Select Download questions and save


From the Preview & Publish tab, Select print options, then select either "Save to File" (Microsoft Word Document) or "Send to Printer".


You have the option to save the Exam with the Answer Key.  Printing without the answer key provides a quick backup plan if Blackboard is not available for online testing.

Here's a video of the process and instructions for downloading Respondus 4.0 Test Creator.

Monday, March 03, 2014

Respondus 4.0 Test Creator Application Instructions

The Respondus software is available via the myNEU "Software Downloads" section.
  1. Go to http://myneu.neu.edu and login using your myNEU fac/staff credentials
  2. Select the "Services and Links" tab
  3. Scroll down and select "Software Downloads" on the left: http://screencast.com/t/DlJmCCk3
  4. Select "Respondus" from the list and select continue: http://screencast.com/t/PinToCtIuIoG (The Respondus 4.0 Test creator is a Windows only application)
  5. Scroll down and select "Accept"
  6. You should download both the "Installer" and the "Update" as separate actions: http://screencast.com/t/b4shl0LNHCb
  7. In the download instructions that appear with the download, note the Organization name and the Install Code.  You will need to enter them later when you install the software.
  8. You must install both the Respondus application and the Update for the Respondus application for the software to work.  Install the Respondus application first, then install the Update.
  9. After you have installed the application and update, run the application, then click the "Help" menu and select "Check for Update": http://screencast.com/t/TVWrKe6mS .  Download and install all updates and then run Respondus again.  Repeat this step, checking for updates multiple times until there are no more updates available.
Here is a video of the Respondus 4.0 Test Creator Application download process: http://screencast.com/t/H4Trqc9CmP


Allowing Respondus to log into your Blackboard account on the blackboard.neu.edu site


If you have trouble publishing to NEU Blackboard from Respondus because of a login error, here are instructions for how to fix it:

  1. Run Respondus. Click the "Help" menu and select "Check for Update": http://screencast.com/t/TVWrKe6mS .  Download and install all updates and then run Respondus again.  Repeat this step, checking for updates multiple times until there are no more updates available.
  2. After creating or opening a test, select the "Preview and Publish", click "Publish to Blackboard", click "Publish Wizard":  http://screencast.com/t/FtScSYpm
  3. In the Publish Wizard, click the "Edit Settings" button: http://screencast.com/t/SnODbXaWaGt
  4. Click the "Delete" button to remove the server: http://screencast.com/t/qID7pMAQ
  5. From the drop-down click "Add New Server": http://screencast.com/t/6EinttzAf
  6. Click "Yes, check for preconfigured server settings" and click Next: http://screencast.com/t/5HfB19uFhS
  7. Enter "blackboard.neu.edu" as the name, and click Next: http://screencast.com/t/MQv1KtBsY
  8. Before logging into Blackboard, open an Internet Explorer browser window (even if you won't be using that browser) and then minimize it and ignore it.
  9. Log into Blackboard and then click the "Close after login" button at the top right:  http://screencast.com/t/0FHZIb6Uo
  10. Click Next and Finish, and proceed to publish your test content


Publishing Going forward

  • You must have an Internet Explorer browser window open, even if you won't be using the browser.        
  • Each time you publish, you will need to log into Blackboard and click the "Close after login" button to proceed.
  • If the content areas in your course are not listing in Respondus, make sure the course you are publishing to in Blackboard has the "Edit Mode" option at the upper right set to ON.  This option is in your course on the Blackboard website itself (not in Respondus)


Thursday, February 06, 2014

Give Audio Feedback on an Assignment in Blackboard Using an MP3 Recorder

You may want to record your own voice for a student to listen to as feedback for a submitted assignment in Blackboard.  Here is how to use an MP3 Recorder website to make this easy.

UPDATE:  The recordmp3.org service appears to be down.  Try alternatives recordmp3online.com or vocaroo.com

The steps involved are:

1.  Navigate to the student's attempt in the Grade Center of your course.

2.  Use recordmp3.org or recordmp3online.com or vocaroo.com to record your commentary / feedback.

3.  Add the audio file you recorded to the feedback section for the assignment attempt.


Here is a video showing the entire process:


(Alternative link to high-resolution video here)


Note:  if you would like to include a screen-capture with your audio feedback, try this alternative method using Jing.


Wednesday, February 05, 2014

How to Use Jing to Give Assignment Feedback in Blackboard

Jing is a screen-capture application which will allow you to record your screen and voice and give you a link to the recording.  You can use this link to give your students feedback on their assignments in Blackboard.

1.  Navigate to the student's attempt in the Grade Center of your course.

2.  Use Jing to record your commentary.

3.  Add the Jing link to the feedback section for the attempt grade.


Here is a video showing the entire process:


(if this video doesn't work, try this alternative link)


The Jing application may be downloaded from www.techsmith.com/download/jing/

Note:  if you would like to give your students audio-only feedback, try this the alternative method here.


Monday, February 03, 2014

How to Download Your Students' Email Addresses

As an instructor of a Blackboard course, you may download or view a list of your students' email addresses. This can be useful if you want to email all of your students from outside of Blackboard, or if you want to copy and paste a list of your student email addresses into Google Docs in order to share a document.

1.  Navigate to your Blackboard course site, and at the lower left click Course Tools > Student Email Addresses.


2.  Click "Spreadsheet" to download a CSV file containing all of your students' email addresses.  Or click "HTML Table" to view the email addresses in a table within your browser.


The best way to copy all of your student email addresses at once is to use the "Spreadsheet" option, open the downloaded file in Microsoft Excel, select all of the cells containing the email addresses at once and then copy and paste.

3.  The list you download using this method may include a few students who were previously registered for your course, but who have already dropped.  If you would like to compare the list to eliminate students who have dropped, here are the locations in Blackboard from which you can get an official current list of students who are officially still enrolled:

Tools > Roster
Course Tools > Users and Groups > Users
Course Tools > Course Roster (FACT)
Course Tools > Course Roster (Photo Grid)
Grade Center > Full Grade Center

In addition if you use any of the Blackboard messaging tools such as Tools > Send Email or Course Tools > Send Email, the email will only be sent to the officially registered students.


.