Friday, October 24, 2014

Columns are missing in the Grade Center and/or you Can't Scroll

If you created a column in the Grade Center of Blackboard, and can't find it, it may be hiding because of your browser zoom settings or your MacOS scrollbar settings.
Try these methods to fix it:

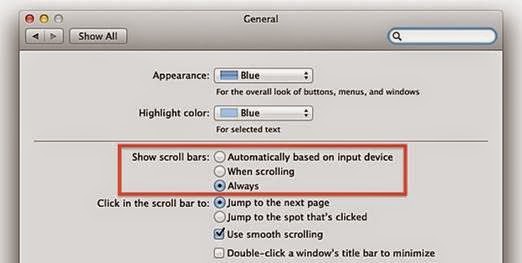
1.  If you're using a Mac, Make sure your Mac preferences are set to display the scroll bars as follows:


a.    Launch System Preferences, either from the Dock or from the Apple menu. b.    Once the System Preferences window opens, select the General preference pane. c.    The middle section of the General preference pane controls when scroll bars appear and a few additional scroll bar options. d.    Select "Always" from the Show Scroll Bars options.


Once your scroll bars are back, use the horizontal scroll to scroll to the right in the Grade Center to find your missing columns.


2.  If you are using Google Chrome, make sure your view zoom is set to 100%Blackboard has a bug where it doesn't display the rightmost column in the Grade Center in Chrome if your zoom is set to anything other than 100%.


3.  The column you're looking for may be hidden.  You can unhide hidden columns by going to the Manage > Column Organization option here:  http://screencast.com/t/MxsDz8vbPL .  Unhide the columns by selecting them and choosing the "unhide selected columns" option at the bottom.


We hope this information is helpful.


.


Thursday, October 23, 2014

How to Sync your Blackboard Calendar to your Outlook Web Mail / Office365 Calendar

You can subscribe to your Blackboard calendar from within Office 365 / Outlook Web Mail.  Below is a video that shows how.  Scroll down for written instructions.

Once you subscribe to your Blackboard calendar from within Outlook, new events in Blackboard will automatically sync to Outlook within an hour or so of being added to your Blackboard courses.

Link to video: http://goo.gl/1spKgx
Unable to display content. Adobe Flash is required.


Instructions:

1.  Go to Blackboard, click the "Home" tab, then click "Calendar"
2.  Use the "Get External Calendar Link" button and copy the link to the clipboard
3.  Go to Office365 at outlook.office365.com.  Log in and click the "Calendar" option.
4.  Right-click the "Other Calendars" link and select "Open Calendar".
5.  Paste the link from Blackboard into the Internet Calendar box and click "Open"

Your Blackboard calendar will be automatically synced to Outlook/Office365 going forward.


How to Sync your Blackboard Calendar to your Google Calendar

You can subscribe to your Blackboard calendar from within Google Calendar.  Below is a video that shows how.  Scroll down for written instructions.

Once you subscribe to your Blackboard calendar from within Google, new events in Blackboard will automatically sync to Google Calendar within an hour or so of being added to your Blackboard courses.

Link to video: http://goo.gl/IMtNLm
Unable to display content. Adobe Flash is required.


Instructions:

1.  Go to Blackboard, click the "Home" tab, then click "Calendar"
2.  Use the "Get External Calendar Link" button and copy the link to the clipboard
3.  Go to Google Calendar at calendar.google.com
4.  Next to "Other Calendars", click the dropdown and select "Add by URL"
5.  Paste the link from Blackboard into the URL box and click "Add Calendar"

Your Blackboard calendar will be automatically synced to Google going forward.


How to Post a Link to a Google Spreadsheet into your Blackboard Course

Google Sheets can be used to allow students in a Blackboard course to edit a spreadsheet collaboratively.

Here's a video showing how to create and post the link in Blackboard:

Link to video: http://goo.gl/EHiW7S
Unable to display content. Adobe Flash is required.

Friday, April 11, 2014

Creating a Non-anonymous Survey in Blackboard


Surveys in Blackboard are anonymous, which means the instructor cannot see which specific student answered a particular way in the survey results.

If you need to create a survey for which you need to attribute specific answers to specific students (a non-anonymous survey), the way to do it in Blackboard is to create a Test and call it a "survey".

To create a non-anonymous survey (Test):

1. Select Course Tools > Tests, Surveys, and Pools from the course management control panel.

2. Select Tests, then Build Test


3. Provide a name, description and student instructions for the non-anonymous survey.  We suggest including the word "Survey" in the name so students will know this is not a test.

4. Next, from the Question Settings page set the Default point value to 0 because this is a survey, not a test, so the questions so have no numeric value.


5. For this example survey, we created one question as an Opinion Scale / Likert question:


6. Since the non-anonymous survey is technically created as a Test, you must select a "correctanswer.  In this example, we select the "Not Applicable" answer as the correct answer.  Since this is a survey, there really is no correct answer, so it does not matter which answer you designate as correct.


7. To deploy the non anonymous survey, set the Make Link Available option to "Yes" and in the "Show test results and feedback to students" section, uncheck the "score per question" checkbox and set only the "Submitted" check box as shown to ensure that the student does not see which answer you designated as the "correct" answer you selected when creating the test:


8. If the survey is already deployed, you can Edit the test options by clicking the drop-down menu to the right of the test link:


9. Here is a video of the entire process.


Tuesday, March 04, 2014

How to print a Blackboard Test Using the Respondus 4.0 Test Creator application

Respondus 4.0 provides an efficient user friendly to print Blackboard Tests.

First download Respondus 4.0 Test Creator.

To print from Respondus 4.0 Test Creator

Retrieval & Reports tab - Select Retrieve questions


Select blackboard.neu.edu and click next


Choose a Course and an Exam and Enter a name for the file


Select Download questions and save


From the Preview & Publish tab, Select print options, then select either "Save to File" (Microsoft Word Document) or "Send to Printer".


You have the option to save the Exam with the Answer Key.  Printing without the answer key provides a quick backup plan if Blackboard is not available for online testing.

Here's a video of the process and instructions for downloading Respondus 4.0 Test Creator.

Monday, March 03, 2014

Respondus 4.0 Test Creator Application Instructions

The Respondus software is available via the myNEU "Software Downloads" section.
  1. Go to http://myneu.neu.edu and login using your myNEU fac/staff credentials
  2. Select the "Services and Links" tab
  3. Scroll down and select "Software Downloads" on the left: http://screencast.com/t/DlJmCCk3
  4. Select "Respondus" from the list and select continue: http://screencast.com/t/PinToCtIuIoG (The Respondus 4.0 Test creator is a Windows only application)
  5. Scroll down and select "Accept"
  6. You should download both the "Installer" and the "Update" as separate actions: http://screencast.com/t/b4shl0LNHCb
  7. In the download instructions that appear with the download, note the Organization name and the Install Code.  You will need to enter them later when you install the software.
  8. You must install both the Respondus application and the Update for the Respondus application for the software to work.  Install the Respondus application first, then install the Update.
  9. After you have installed the application and update, run the application, then click the "Help" menu and select "Check for Update": http://screencast.com/t/TVWrKe6mS .  Download and install all updates and then run Respondus again.  Repeat this step, checking for updates multiple times until there are no more updates available.
Here is a video of the Respondus 4.0 Test Creator Application download process: http://screencast.com/t/H4Trqc9CmP


Allowing Respondus to log into your Blackboard account on the blackboard.neu.edu site


If you have trouble publishing to NEU Blackboard from Respondus because of a login error, here are instructions for how to fix it:

  1. Run Respondus. Click the "Help" menu and select "Check for Update": http://screencast.com/t/TVWrKe6mS .  Download and install all updates and then run Respondus again.  Repeat this step, checking for updates multiple times until there are no more updates available.
  2. After creating or opening a test, select the "Preview and Publish", click "Publish to Blackboard", click "Publish Wizard":  http://screencast.com/t/FtScSYpm
  3. In the Publish Wizard, click the "Edit Settings" button: http://screencast.com/t/SnODbXaWaGt
  4. Click the "Delete" button to remove the server: http://screencast.com/t/qID7pMAQ
  5. From the drop-down click "Add New Server": http://screencast.com/t/6EinttzAf
  6. Click "Yes, check for preconfigured server settings" and click Next: http://screencast.com/t/5HfB19uFhS
  7. Enter "blackboard.neu.edu" as the name, and click Next: http://screencast.com/t/MQv1KtBsY
  8. Before logging into Blackboard, open an Internet Explorer browser window (even if you won't be using that browser) and then minimize it and ignore it.
  9. Log into Blackboard and then click the "Close after login" button at the top right:  http://screencast.com/t/0FHZIb6Uo
  10. Click Next and Finish, and proceed to publish your test content


Publishing Going forward

  • You must have an Internet Explorer browser window open, even if you won't be using the browser.        
  • Each time you publish, you will need to log into Blackboard and click the "Close after login" button to proceed.
  • If the content areas in your course are not listing in Respondus, make sure the course you are publishing to in Blackboard has the "Edit Mode" option at the upper right set to ON.  This option is in your course on the Blackboard website itself (not in Respondus)


Thursday, February 06, 2014

Give Audio Feedback on an Assignment in Blackboard Using an MP3 Recorder

You may want to record your own voice for a student to listen to as feedback for a submitted assignment in Blackboard.  Here is how to use an MP3 Recorder website to make this easy.

UPDATE:  The recordmp3.org service appears to be down.  Try alternatives recordmp3online.com or vocaroo.com

The steps involved are:

1.  Navigate to the student's attempt in the Grade Center of your course.

2.  Use recordmp3.org or recordmp3online.com or vocaroo.com to record your commentary / feedback.

3.  Add the audio file you recorded to the feedback section for the assignment attempt.


Here is a video showing the entire process:


(Alternative link to high-resolution video here)


Note:  if you would like to include a screen-capture with your audio feedback, try this alternative method using Jing.


Wednesday, February 05, 2014

How to Use Jing to Give Assignment Feedback in Blackboard

Jing is a screen-capture application which will allow you to record your screen and voice and give you a link to the recording.  You can use this link to give your students feedback on their assignments in Blackboard.

1.  Navigate to the student's attempt in the Grade Center of your course.

2.  Use Jing to record your commentary.

3.  Add the Jing link to the feedback section for the attempt grade.


Here is a video showing the entire process:


(if this video doesn't work, try this alternative link)


The Jing application may be downloaded from www.techsmith.com/download/jing/

Note:  if you would like to give your students audio-only feedback, try this the alternative method here.


Monday, February 03, 2014

How to Download Your Students' Email Addresses

As an instructor of a Blackboard course, you may download or view a list of your students' email addresses. This can be useful if you want to email all of your students from outside of Blackboard, or if you want to copy and paste a list of your student email addresses into Google Docs in order to share a document.

1.  Navigate to your Blackboard course site, and at the lower left click Course Tools > Student Email Addresses.


2.  Click "Spreadsheet" to download a CSV file containing all of your students' email addresses.  Or click "HTML Table" to view the email addresses in a table within your browser.


The best way to copy all of your student email addresses at once is to use the "Spreadsheet" option, open the downloaded file in Microsoft Excel, select all of the cells containing the email addresses at once and then copy and paste.

3.  The list you download using this method may include a few students who were previously registered for your course, but who have already dropped.  If you would like to compare the list to eliminate students who have dropped, here are the locations in Blackboard from which you can get an official current list of students who are officially still enrolled:

Tools > Roster
Course Tools > Users and Groups > Users
Course Tools > Course Roster (FACT)
Course Tools > Course Roster (Photo Grid)
Grade Center > Full Grade Center

In addition if you use any of the Blackboard messaging tools such as Tools > Send Email or Course Tools > Send Email, the email will only be sent to the officially registered students.


.


Wednesday, January 29, 2014

How To Add Someone Into Your Blackboard Course

Students and Instructors are enrolled automatically into Blackboard.  Any update made with the Registrar's office will be automatically updated in Blackboard over time.

***To add an auditing student to your course, please contact the Registrar's Office at scheduling@neu.edu.  Any auditing student who is added to a course in the Registrar's system will be automatically added in Blackboard.


To add a Teaching Assistant, Assistant, guest lecturer/unofficial co-instructor, Course Builder, Organization Builder, or Grader into your course/organization:

1.  Go into your course/org site in Blackboard and at the lower left click Users and Groups > Users.


2.  Click Enroll User > Find Users to Enroll.


3.  Click the “Browse” button and search for the person by Last Name or Email.  


If you have trouble finding the person, make sure you are not searching by username.  If a person has a drop in the course, you will not be able to enroll them.  In that case, contact help@neu.edu.


4.  Select the Role you want the person to have from the drop-down (e.g. "Teaching Assistant") and click Submit.  Do not add users using the "student" role.  Audit students must be added by the Registrar's office (see note above).

That's it.  You may see a list of who is enrolled in the course by clicking Users and Groups > Users > GO


Saturday, January 25, 2014

How to Diagnose Chrome Extension Issues

Chrome should work well with Blackboard, but if you have trouble it is possible that you have a Chrome Extension in Chrome which is causing the issue.

To diagnose this, try using the Blackboard site in Chrome's "Incognito Mode", which turns off most of the extensions you may have.

To do so, click the Chrome menu at the upper-right and select "New incognito window"


In the incognito window, go to the blackboard.neu.edu site and use Blackboard normally.  If Blackboard works better for you in the incognito window, it means that there is a Chrome extension which is interfering with Blackboard under normal circumstances.

To figure out which Chrome Extension is causing the problem, go back to the regular (non-incognito) Chrome window, click the menu and select Tools > Extensions


Uncheck the "enabled" boxes for all of your extensions to disable them, and then check one at the time, going back to Blackboard each time to figure out which one is causing the difficulty.


Using this method you will be able to figure out which of your extensions is the offender.  To remove the bad extension, click the trashcan icon to the right.

We hope this information is helpful.  Thanks for using Blackboard.


Thursday, January 23, 2014

Creating Smart Views in Blackboard

Blackboard supports Grade Center smart views to limit the number of rows or columns shown in your grade center.

1.  To show specific columns in a grade center view, first go to Grade Center > Full Grade Center in your Blackboard course, and click the Manage > Column Organization option.  Move all grade center columns from the default location: "Shown in All Grade Center Views" to the section below "Not in a Grading Period", being careful to maintain your column order.


2. Next, verify your columns are categorized, if not use this to associate each column with a category:


3. Now we are ready to create the smart view as shown (Manage > Smart Views)


4. To limit the number of columns in your grade center smart view, choose to show one category of columns, select "Category and Status View items by their category and status" as shown, select the category from the Categories drop down and select the users to display or set to all users:


5. You may also limit the number of rows displayed based on criteria such as 1. Group affiliation, 2. Performance on an assessment, 3. individual students, or 4. a custom set of criteria as shown:


6. Setting the smart view as a favorite will show it as a Grade Center submenu option:


7.  Your new Smart View will display under "Grade Center" at the lower left of your course site.  Clicking the Smart View will display only the Columns in the Grade Center that match the Smart View criteria.