Tuesday, August 28, 2007

How to add a Blog to your Blackboard course

Blogs are journal-like web spaces that students can post material to. As the instructor, you can decide who in your class is allowed to post content to a blog, and who is allowed to read the blog. You can use a Blog to have students post a journal, upload files, upload homework, text, pictures, or even sound files.

Here is how to add a Blog to your course site in Blackboard:


Step 1 - Choose a content area

First toggle Edit Mode at the upper right of your course to "on"


Click a content area in your course menu on the left in which you would like the Wiki to appear (you could choose "Course Material" or "Documents" for example).


Step 2 - Add the Blog

Use the "Add Interactive Tool" button and click on "Campus Pack Blog":


Choose "new" Blog and click the Submit button.

Give your Blog a title and choose grading options:
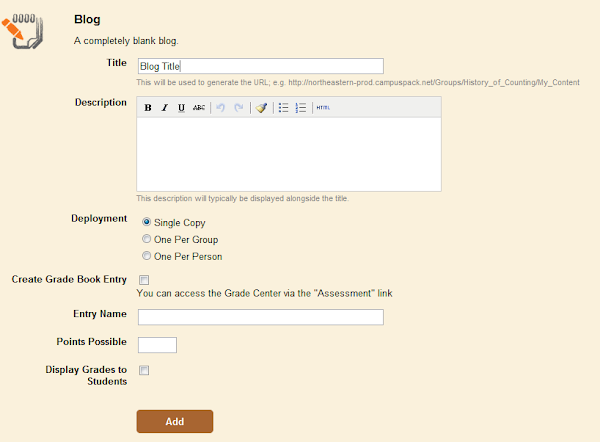


Step 3 - Add an Entry to the Blog

Use the "Add New Entry" button to add the first entry to the Blog. Use the "Permissions" settings at the top to decide which of your students or groups will have access to the Blog to make entries and view it.


Step 4 - How students can access the Blog

The Blog will appear in your course under the section you chose in step 1. To view or add entries to the Blog, students click the View link


If they have permission, students can add entries to the Blog by clicking "Add New Entry" on the right side of the page.

That's all there is to it. Your Blog is now ready to use.

Friday, August 24, 2007

How to Clean Up/Edit Your Course List in Blackboard

If you've had many courses in the past, you may have a large list of courses in the My Courses module on the front page of Blackboard.

Here is a quick way to reduce the clutter and make it easier for you to find current courses more quickly:

1. Log in to Blackboard.

2. On the Home tab, you will find the "My Courses" module.

Hover your mouse at the upper-right corner of the module, and click on the gear-shaped icon that appears.


3. The Customize My Courses screen appears. You will notice a list of your courses with a series of check boxes to the right of each.

4. Uncheck the boxes in the "Select All" column for the courses you want to remove.


5. Click Submit when you are done.

If you prefer to have all your courses listed in the My Courses module, but need an easy way to distinguish between courses by term, check the box in Display Course ID column. When you go back to the My Courses module you will see the Course ID listed next to the name. The Course ID includes a four (4) character suffix that designates its semester and year (e.g. fl09 = Fall 2009, sp08 = Spring 2008).

If you ever need to see a list of all your courses (e.g., you need the Course ID when requesting a new course), you can always see this by clicking on the Courses tab at the top of the screen. Here you will see a complete list of your courses.


How to completely remove your course from Blackboard

If you want to remove (archive) your course from the site completely, fill out the following form:

-> http://www.ats.neu.edu/blackboard/requests/delete

Your course will be deleted (archived). If you wish to have it restored at a later time, send a request to help@neu.edu.