Tuesday, December 03, 2013

Blackboard Service Pack 14 (SP14)

Update:  Having trouble seeing the tabs in Blackboard since the upgrade? Make sure "Compatibility View" in Internet Explorer is turned OFF.  Click here for instructions.

Service Pack 14 includes the new features in Service Packs 12-14.  New features coming with the upgrade:

Achievements

The achievements tool allows instructors to designate criteria for issuing rewards to students in the form of both badges and certificates. Students can see which rewards they’ve earned and what is required of them to receive additional rewards, providing insight into learning progression toward defined competencies.  More Information | Video

Accessibility Improvements

This Service Pack introduces an innovation that improves Learn’s navigation experience for all users, but especially sighted keyboard-only users, through page header and landmark aggregation. There are also enhancements to Test Availability Exceptions and Content Editor Math Formulas which are helpful for accessibility. More Information | Video

Calendar

New calendar replaces the old calendar tool. Faculty and students can view institution level, course and personal events in a single calendar view.  More Information | Video

Content Editor Math Formulas

This Service Pack brings a new editor that is based on JavaScript. This removes dependence on Java, enabling full math-editing capabilities on platforms that cannot run java in browsers including iOS. The new math editor also supports the editing and display of LaTeX formulas.  More Information | Picture

Course Menu Enhancement

Viewing the folder structure of the course now always opens in a new window, to ensure users have the space needed to read the expanded contents. More Information | Picture

Grade Center Improvements

Blackboard has made several improvements to grading and Grade Center.  (1) My Grades Ordering & Design Update, (2) Define “Score Attempts Using” setting from the “Options” page, (3) Test total points adjustment, (4) Grading Schemas greater than 100%. More Information | Picture

Groups Management

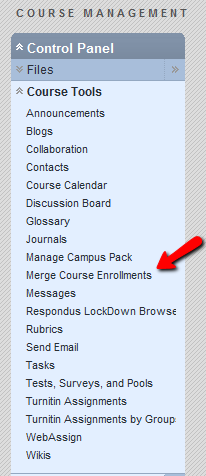
The Groups Management Building Block provides the ability to (1) Easily see which students are in which groups (2) Easily see and modify group memberships (3) Avatars are now available to distinguish among users (4) Choose and manage membership for groups sets with an improved workflow (5) Import and export groups and group memberships (6) Sort columns, perform bulk actions for deleting groups, and create Grade Center smart views for one or more groups on the All Groups page (7) Optionally, manage tool availability for all groups on the All Groups page.  More Information | Video

Inline Grading

For interactive tools and assignments, you can view, provide comments, and grade student-submitted items without leaving the tool page.  More Information | Video

Restrict Tests by Location

Restricts a test so it can only be taken from a set range of machines (by IP addresses).  This feature will require setting up the IP address ranges with the Blackboard Administrators group before the test.  More Information

Retention Center

The Retention Center is an instructor-only tool that enables teachers to give focused attention to students who need it. It replaces the Early Warning System feature with easy workflows, while retaining all existing Early Warning System data and rules. From the Retention Center, you can communicate with struggling students and help them take immediate action for improvement.  More Information | Video

Test and Survey Options

(1) Test Availability Exceptions:  new settings have been added to the Test/Survey Options page, available after the test or survey is added to a content area.  The new settings allow instructors to select one or more groups of students and make a number of exceptions to the already established availability settings. Instructors can use exceptions to provide an accommodation to a disabled student, or provide accommodations for technology and language differences.  (2) Show Test Results and Feedback to Students:  after they complete a test, results and feedback are available to students. By setting up rules, instructors can set the release of progressive feedback to keep test results secure and prevent cheating.  More Information

Date Management

After you have copied a course, speed up the transition of old dates to new one relevant for the new course using Date Management. From Date Management you can adjust availability dates, due dates, and adaptive release dates within a course. You can choose to update the dates automatically or manually from one convenient location.  More Information | Video

Course Message Notifications

Course messages are private and secure text-based communication that occurs within a course and among course members. Although similar to email, you must be logged into a course to read and send course messages.  Before Service Pack (SP14), the only way to know if you had any new course messages was to constantly log in to your course and check. In SP14, course messages are part of the notifications framework. Anyone enrolled in a course can receive notification that they have new messages from the Updates area in My Blackboard.  More Information | Video

Discussions

The Discussions building block that was incorporated into this Service Pack changes the discussion board user interface in two primary ways:  (1) The thread detail page has been thoroughly redesigned while maintaining all of its current functionality.(2) Instructors now can require students to first post to a forum before they can see other students’ posts.  More Information | Picture


If you have any questions about the service pack upgrade, please contact help@neu.edu or phone 617.373.HELP

Monday, December 02, 2013

Turn Off Compatibility Mode in Internet Explorer

Compatibility View is a mode that makes Internet Explorer render pages as if it were an older version of itself (version 7 specifically).  You will have trouble viewing parts of the Blackboard website in this mode.  Here's how to make sure "Compatibility View" is turned OFF for the Blackboard site:

1.  In Internet Explorer, go to the Blackboard website.

2.  Press and release the ALT key on your keyboard to display the "Tools" menu at the very top of the browser.  Click "Tools > Compatibility View Settings":


3.  Make sure the Blackboard site is not in the list of sites you've added to Compatibility View (if it is, remove it).  Make sure "Display all websites in Compatibility View" not checked.  Also, make sure the "Display intranet sites in Compatibility View" option is not checked:


4.  Click Close.  Then click the "refresh" icon at the top of Internet Explorer (or press F5 on your keyboard to refresh)


That's it.  Compatibility View has been turned off and the Blackboard site should now render properly.


How to schedule due date reminders

You may edit your notification settings to tell Blackboard that you want to receive due date
reminder email messages

Edit your notification settings:

  1. Login to Blackboard. 
  2. At the very top-right of the page, click your name.
  3. Click "Settings", then "Edit Notification Settings" from the drop-down.


  1. On the Edit Notification Settings page, click Edit General Settings

You will see the General Settings page.

Under General Settings: Courses

Set "Send Due Date Reminders" to Yes and set the number of days before the due date to send the
reminder.  You will now receive a reminder message for each due date event for which you have 
elected to receive notifications (refer to the "How to Edit Notification Settings" page)


    How to Schedule Notification Emails

    You may edit your notification settings to tell Blackboard that you want to receive email 
    notifications as either a daily digest or as individual messages

    Edit your notification settings:

    1. Login to Blackboard. 
    2. At the very top-right of the page, click your name.
    3. Click "Settings", then "Edit Notification Settings" from the drop-down.


    1. On the Edit Notification Settings page, click Edit General Settings

    You will see the General Settings page.

    Under General Settings: Courses

    Select Individual Messages to receive a message for each event for which you have elected to
    receive notifications (refer to the "How to Edit Notification Settings" page)

    Or Select Daily Email Digest to receive a daily digest of all notifications from either your courses
    or your organizations (communities).


    Tuesday, November 26, 2013

    How to Merge Courses in Blackboard


    Update:  the Merge Course Enrollments function is no longer available on Northeastern University Blackboard since our upgrade to SaaS-Blackboard hosting at the beginning of 2018.  To have your courses merged, please request via the merge request form on this page:

    https://www.northeastern.edu/ats/how-to-merge-courses-in-blackboard-2018/


    Outdated information follows:

    If you are teaching several different course sections of the same course, or two cross-listed courses, you may want to combine your students into one course site in Blackboard.  You can combine courses in Blackboard by using the "Merge Course Enrollments" tool, which will copy (merge) your students from one of your sections into another.

    Here's how:

    1. Click into the main course which you want to use for teaching.  This will be called the "parent" course.  Click Course Tools > Merge Course Enrollments at the bottom left


    2.  Click "Merge Section Enrollments Into this Course".  On this screen, you may optionally change the name of the parent course to indicate that will be a combined course, for example you could change the name to "History 101 - Sections 01+02 - Fall 2014"


    3.  Select the child section(s) you want to merge into the parent course.  You can select more than one child section by using the CTRL key (Command key on a Mac) on the keyboard while clicking.


    4.  Click Submit


    All the students will be copied from the child course into the parent course automatically and will be maintained going forward.

    In the Grade Center of the parent (main) course, there will be a column showing the original section the student was in before the merge as a reference.

    If you should ever find you need to un-merge a course after merging it, to do so go to "Merge Course Enrollments" in the parent course again and select "Remove a section merged into this course (Un-merge)".  The students from the child course will be unenrolled from the parent course, but will remain in the child course.


    Notes:

    - The merge function merges in the students from the child courses but does not merge or copy course material.  You will need to post the course material you wish to distribute in the main parent course as you normally would, or use the course copy function to copy material from one course site to another as desired.

    - The merge function does not copy student grades, assignment submissions, or tests from one course to another.  It only copies the student enrollments and maintains them going forward.


    How to Use the Sign-up Tool in Blackboard

    Blackboard has a sign-up tool that can be used to schedule slots for students to sign up for within a course.  You can use this tool to create a sign-up list for an activity, to create multiple lists to use as slots for office hours, paper topics, or any other shared resource.


    1.  Click here to view a video which shows how to use the Sign-up tool to create a sign-up list.


    After you have watched the first video, here is a second one showing how to create multiple sign-up lists to be used as "slots" (for example, for office hours, or for exam slots).

    2.  Click here to view a video on how to use the Sign-up tool to create multiple lists to use as sign-up slots. *


    * NOTE Update to the second video: instead of selecting "Multiple SignUp Lists", instead just select "SignUp List" and then click "Batch Create" here: http://screencast.com/t/KBaaNXUPy


    We hope these videos are helpful.


    Monday, October 28, 2013

    How to Embed a Video in your Blackboard Course the Easy Way


    1.  Go to http://youtube.com and upload the video as "Unlisted" so the video will not be public


    2.  Enter your course site in Blackboard and make sure Edit Mode is set to ON at the top-right so you can add content to your course


    3.  Go into a content area such as "Course Material" and click the "Build Content > Item" option


    4.  Give the item a title and in the text editor click the video button in the toolbar (it looks like a small webcam with a red dot):


    5.  Click the "Browse" tab.  Sign into YouTube, locate the video that you uploaded in step 1, and click the "insert" button


    6.  Change the Width and Height to 640 x 480 and click the Insert button


    7.  Scroll down and click the Submit button in Blackboard


    That's it.  Your video is posted.  To see what this looks like from your students' point of view, try the Student View option.


    Wednesday, October 09, 2013

    Blackboard Online Collaboration

    There are several options for online collaborate in Blackboard.  Here are a few of them.


    Blackboard Collaborate is a real-time Webex-like live conferencing system built into Blackboard. The system can handle hundreds of students at once with multiple moderators (instructors). Features include live video and audio, a whiteboard feature, chat, and application/web sharing. Blackboard Collaborate is located in the Tools section of your Blackboard course.
    • Information Technology Services overview page 
    • Collaborate documentation
    • Collaborate overview using Collaborate to demonstrate the tool (open the downloaded jnlp file)
    • First make sure you have the latest version of Java installed

    Blackboard IM is a live text-based Chat which you can use with your students. Blackboard IM is located in the Tools section of your Blackboard course.

    Blackboard Discussion Boards are a well-understood traditional asynchronous way to post content and have your students communicate with the instructor and each other.

    Tegrity: To record a prepared video lecture which you can offer to the students as part of your online classroom experience, please use the Tegrity Class Capture feature, located in your Blackboard course.

    Google Hangouts/Google On Air

    For casual, non-moderated live video collaborate, we can recommend "Google Hangouts On Air". This service allows you to broadcast video and audio to many people with whiteboard and document collaboration.  This service is not affiliated with Northeastern University, but you can invite the students from your Blackboard course to your Hangout by getting their email addresses from your Blackboard course site.


    Tuesday, October 08, 2013

    How to Upload Questions from a File into a Question Pool in Blackboard


    To create a pool of test questions in blackboard, you will need to begin with an empty pool.
    From Control Panel -> Organizational Tools -> Tests, Surveys and Pools, click "Pools" and then
    "Build Pool":  http://screencast.com/t/5EK5MXDiS1


    Once you have built the pool, you are ready to import test questions.   Questions must follow the Blackboard question and answer format here:


    An example of this format can be seen in this video, which also shows how to save as a tab delimited file from Excel:


    If you are creating your test questions in a text editor, you can simply use the tab key between fields and then save the file as text (.txt).

    If you are working in Excel, you must specify the file type “tab delimited text.”     

    To import your test questions to your question pool, from Control Panel -> Course Tools -> Tests, Surveys and Pools, click "Pools."   Click the arrow next to the name of your pool to display the options menu, and choose "Edit."
    In the next screen, choose "Upload Questions."  Browse to your question file and select the file, then assign a default number of points per question.  This number can be changed later.  Click "Submit" to complete the upload:   http://screencast.com/t/Lagew9vEUHU


    Friday, September 20, 2013

    How to Use the Student View in Blackboard


    Blackboard instructors can view a course exactly as a student sees it in order to verify the availability of items to students, try an assessment from a student's point of view, or to see what the course looks like as a student generally.

    To view a course from the point of view of a student, select "Go To Student View" from the top-right of your course site.


    This will create a demo student called "Demo User" in your course.  You will become the demo student and you will be able to click around your course and see what it is like from the point of view of a student.


    When you are ready to return to the instructor's view of the course, click "Return to Teacher View" at the top-right.


    If you submitted an assignment or took a test while using the Student View, when you return to Instructor view, you will find the results in the Grade Center under the student name "User, Demo" (Demo User).  This Demo User is temporary and will be deleted automatically within 24 hours.


    We hope you find the Student View useful in your course.


    Thursday, September 19, 2013

    Blackboard Service Pack 15 (SP15)

    This page has moved.  For information on NEU Blackboard's SP14 upgrade on 12/22, please see:

    http://j.mp/neu-bb-sp14


    SP15 has not been released by Blackboard yet, but future upgrade plans for SP15 and above will be posted here.

    If you have any questions about the service pack upgrade, please contact help@neu.edu


    Thursday, August 08, 2013

    Inline Grading for Blackboard Assignments

    Inline Assignment Grading enhances the grading experience for faculty and teachers in Blackboard Learn. Instead of requiring instructors to download student-submitted files to view or edit those submissions, instructors can now see those files "inline," i.e. in the web browser. Annotation tools also enable instructors to provide feedback--comments, highlights, and even drawing--directly on the inline view of the document.

    To begin using Inline Grading, enter your Blackboard course site and go to the Full Grade Center. Click your students’ Assignment attempts in the grade cells of the Grade Center in your course as you normally would to access the student submissions.  You will notice the heads-up paper display right away.


    Blackboard Assignments accept the submission of any document type by students.  Document types that can be displayed in-line for grading are Word (DOC, DOCX), PowerPoint (PPT, PPTX), Excel (XLS, XLSX), and PDF (PDF). The converted document is displayed in a viewer on the Grade Assignment page.  Any document type that a student submits which cannot be displayed in-line can still be downloaded and viewed offline by the instructor, just as in previous versions of Blackboard.


    Monday, July 01, 2013

    How to create a Peer-evaluation Assignment using PeerMark in Blackboard

    To create a Peer-evaluated Assignment in Blackboard, we recommend using the Turnitin Peermark feature.


    Step 1: Create a Turnitin assignment

    PeerMark is a feature within Turnitin. You must first create a Turnitin assignment within Blackboard in order to use PeerMark.  Whether you choose to use the Originality reporting or not will be determined by your settings when you create the Turnitin assignment.  See the Using Turnitin within Blackboard web page for detailed instructions regarding how to set up the initial Turnitin assignment.


    Step 2:  Synchronize the Blackboard Roster with Turnitin

    Under the Control Panel at the lower left of your Blackboard course, expand the Course Tools section and select Turnitin Assignment.
    • Click on the linked name for the Turnitin Assignment created in step 1 above.
    • Click on Roster Sync.


    Step 3: Create a PeerMark Assignment

    To create a PeerMark assignment in Blackboard:
    • Select a content area (e.g. Course Material) in the Blackboard course.
    • With Edit Mode "on", click on Assessments and select Turnitin Assignment from the drop-down menu.
    • Once the Turnitin page opens, select the "Assignment Type": PeerMark Assignment.
    • Click the Next Step button.
    • Select the existing Turnitin Assignment created in Step 1 that will become the basis of the PeerMark activity from the drop down box.
    • Assign a Point value for the PeerMark phase of the assignment.  Those are the points that will be given to the student reviewers for their reviews.  Optionally, you may click on the box to Award full points if review is written.
    • Click on the Show more options link.  Review the settings and make decisions regarding
      • Assignment title
      • Assignment description and/or instructions
      • Additional Settings
        • Allow students to view author and reviewer names
        • Allow students without a paper to review
    • Establish the Start, Due, and Post dates and times for the PeerMark assignment.
    • Click on Show more options.  Review the settings and make decisions regarding  whether to
      • Allow submitters to read all papers after Start date
      • Allow students to read ALL papers and ALL reviews after Post date
      • Specify the last date for papers to be submitted and still be included in the pool of papers to be reviewed.
    • Click on Save & Continue.
    • Click on the Edit link on the PeerMark Settings screen to establish how papers will be distributed and then click on the Save button.
    • Click on the Show more distribution options on the PeerMark Settings  screen.  Note that you can manually pair and/or exclude students from the PeerMark assignment.
    • Click on Save and Continue.
    • Click on the Add Question button and begin to create the criteria your students will use to evaluate their peers’ papers.  Note that you can create your own Free Response or Scale questions, or choose items from a Sample Library.  Add as many questions as you like. When you are finished, click on Save & Finish.
    • Click the Save and Finish button to finalize the PeerMark assignment.


    Step 4: Viewing and Grading a PeerMark Assignment

    Instructors can view the student's peer reviews, add their own reviews, and grade the reviewers through the PeerMark link within the course content area where the PeerMark Assignment has been deployed.

    • Navigate to the course content area where the PeerMark assignment has been deployed (e.g. Assignments > Week 1).
    • Click on the >> View link for the PeerMark assignment


    Consult this Turnitin page for additional information:  PeerMark Overview


    Monday, April 01, 2013

    Service Pack 11

    New Features in Blackboard 9 Service Pack 11

    Northeastern University’s Blackboard environment will perform an update during the early morning hours of Sunday April 28, 2013. This update will begin at 12:01am and will take approximately 8 hours. Listed below is an overview of the primary new features that faculty and students will experience in Blackboard 9.1 Service Pack 11 (SP11).

    Discussion Board Updates

    The discussion thread detail page is thoroughly redesigned yet maintains all of its existing functions. Some key changes are:
    • All posts on one page – all of the posts in a thread are now visible at the same time on one page.
    • Role highlighting – posts made by forum managers and moderators now contain the user’s course role and forum role.
    • Inline replies – when replying to a post, the content editor used to write a response appears on the same page, in the context of the discussion.
    • Post First Setting – instructors can use a new forum setting to require students to post to a forum before they can see other students’ posts.
    Discussion Board Updates - Thread detail
    Discussion Board Updates – Thread detail
    To learn more about the updated feature, click here or watch this video.

    My Blackboard

    My Blackboard – Posts, Updates, and My Grades, enable faculty and students to stay up-to-date on what’s going on across all their Courses and Organizations in Blackboard. Now, the critical information you need to know from across all of Learn is consolidated in a simple, modern, easily consumable way. Notifications and updates will also be combined with the student having the ability to control what notifications are seen and how they are transmitted.
    Each of the tools will be discussed in detail below.
    My Blackboard
    My Blackboard

    New Global Navigation Menu

    The entry point to My Blackboard is a new Global Navigation Menu. This new menu is available all the time in the top right corner of the Learn interface and provides one-click access to your Courses, Organizations, Settings, Blackboard Help, and the new My Blackboard tools. You can see the new My Blackboard tools going down the left-hand side of the menu in the screenshot below. And the numbers in red tell you if there’s something that’s new or needs your attention – so you never have to worry about missing anything. With this new Global Navigation menu, you can access everything you need quickly and easily, from wherever you are in the Blackboard Learn platform.
    New Global Navigation Menu
    New Global Navigation Menu

    My Blackboard: Updates (part of the global navigation feature)

    The Updates tool in My Blackboard consolidates all of your Notifications from across all your Courses and Organizations, so you never miss a thing. This tool updates you on course announcements, when new content or assignments are added to a course, when an assignment or assessment is due, and much more. And educators can also see when assignments and assessments need grading. To make it easy to manage this information, there are filters so you can look at all Notifications at once, only those from one particular Course or Organization, or just all Course Announcements. You can also change your notification preferences and pick exactly what you want to show up in this tool. With these helpful features, you can ensure you’re always up-to-date on important updates from across Blackboard Learn.
    My Blackboard: Updates
    My Blackboard: Updates

    My Blackboard: Posts (part of the global navigation feature)

    The Posts tool in My Blackboard consolidates all posts from discussion boards, wikis, journals, and blogs across all your Courses and Organizations. To make it easy to manage this information, there are filters so you can look at all Posts at once, post that have not been read or, only those from one particular Course or Organization. The posts tool also has the ability to reply to the post without having to go directly into the Course or Organization.
    My Blackboard: Posts (part of the global navigation feature)
    My Blackboard: Posts (part of the global navigation feature)

    Calendar Update

    The updated calendar will allow all users to view institution level, course, and personal events in a single calendar view. When accessed from My Blackboard or the Tools menu on the My Institution tab, the calendar displays a consolidated view of all institution, course, organization, and personal calendar events for a user. Calendar events are color coded to indicate which place they belong. When accessed from a course, instructors and students see the course calendar from the course menu on the Tools page. Instructors can use the calendar course tool as a primary way of managing and communicating the schedule of events and assignments in the course. Calendar supports due dates, if set, for gradable items. Clicking on calendar items allows an instructor to view or edit the item, or grade attempts on the associated item. Students can use filtering options to selectively view only course level items. They can then click on an item to view item details, and if supported, create an attempt against the item. You can export your Blackboard calendar into your Google calendar now.
    Calendar Update
    Calendar Update
    Additionally, there is color coding and faculty move course items around using drag & drop on the calendar and their course due dates will automatically be updated to match.
    For more information regarding the New Calendar watch this.

    My Blackboard: My Grades

    The My Grades tool found in My Blackboard consolidates all your grades from across all your courses into one view. There’s no need to go in and out of all your courses to check your grades. You can quickly see a stream of the latest grades you’ve received, so you never miss a new grade that was posted. When you click on a grade in the stream, you will see additional detail like your instructor’s feedback and the class average if your instructor has made it available. You can also click into a Course view if you want to see your grades by course. For each Course, you can see your current overall grade (if your instructor has made it available to you), as well as graded items in the course, submitted items that haven’t been graded yet, and upcoming assignments and assessments. My Grades is the only place you need to go to check your grades.
    My Grades Tool
    My Grades Tool

    My Blackboard: Retention Center

    The Retention Center provides an easy-to-use data visualization and pre-configured rules for identifying at-risk students in a course. The Retention Center automatically calls out students who may need the instructor’s attention, making it easy for instructors to catch and respond to risk factors quickly to help the at-risk students succeed in the course.
    My Blackboard: Retention Center
    My Blackboard: Retention Center
    Watch a video about the Blackboard Retention Center.

    One-Way Text and Text-to-Voice Notifications

    You can now opt in to receive automated course notifications and system wide announcements through texts and/or text-to-voice calls. From course announcements, to an assignment that’s due, you can stay updated anytime, anywhere from your mobile device. It is important to understand that you this communication is only one-way. Meaning you can received mobile messages, but cannot respond to them.
    One-Way Text and Text-to-Voice Notifications
    One-Way Text and Text-to-Voice Notifications

    New Content Editor

    The new and improved Content Editor enables simple content creation through an easy to use interface. The editor reads, writes and renders modern HTML – so the content you created in Microsoft Word and the course pages you designed so carefully in Dreamweaver will render with great fidelity within Blackboard Learn. We’ve made sure that the essential functions you need are there – the ability to resize images, find/replace, and simple icons in the toolbar for everyday tasks. And you can easily add rich content by pulling in mashups from YouTube, Flickr, Slideshare, Twitter, and more. Another great feature of the new Content Editor is that you can expand it for full-frame editing, giving you a lot more real estate to build rich content.
    New Content Editor
    New Content Editor
    Additionally, there is a new math editor in Blackboard Learn that simplifies creation and delivery of equations by enabling editing directly from the Content Editor. The new math editor supports saving and copy/paste of equations using mathML.
    New Math Content Editor
    New Math Content Editor
    Watch a video on using the new Content Editor.

    Item Analysis

    The new Item Analysis feature helps you easily assess and refine your tests and quizzes by evaluating the quality and validity of each question and that question’s ability to discriminate between students who understand the material and those who do not. Ineffective questions can be easily identified and then you can quickly correct them with the Automatic re-grade feature. As an educator, you will be able to access an at-a-glance summary of your Blackboard assessments (see below). This summary provides insight into student performance on that assessment and how the question items performed.
    Item Analysis
    Item Analysis
    And from this summary page, when you scroll down, you can see a list of questions sorted in order of discrimination – with the most ineffective listed on top. A simple red dot next to a question tells you if the question requires review.
    Item Analysis detail
    Item Analysis detail
    After examining the question, you can see whether it was poor wording, vague answer choices or some other factor. If you decide to change or update that question, you can immediately take action right from this page by clicking the “Edit Test” button. You will be taken directly to the assessment where you can use the automatic regarding feature to either update or delete the question and regrade it – even if students have already completed the assessment. And the updates flow automatically into the Grade Center. In summary, with the new Item Analysis feature, you can quickly and easily ensure that your assessments are successful discriminators of student performance.
    Watch a video on item analysis.

    Fill in the Blank Question Enhancement

    Educators can now take advantage of using “contains” and “pattern match” logic when grading Fill in the Blank questions. That means you no longer have to rely upon an exact match for Blackboard Learn to automatically grade these questions. So you no longer have to enter multiple answer choices when creating a Fill in the Blank question in order for Blackboard to grade the question for you. For example, let’s say your test question is “Who was the first president of the United States?” Instead of trying to enter all possible correct answers for the blank (George Washington, Washington, President Washington, President George Washington, etc.), you can simply select “contains” and type Washington.
    Fill in the Blank Question Enhancement
    Fill in the Blank Question Enhancement

    File Picker Enhancement

    A new and improved File Picker will be available everywhere you attach files. The goal with Service Pack 10 was to de-clutter the page, remove unnecessary functionality and make the primary action of choosing a file as easy and simple as possible. The new File Picker will be available for both direct file attaching, as in Assignments, or attaching files via the Content Editor.
    File Picker Enhancement
    File Picker Enhancement

    Video Everywhere

    Video Everywhere is available in the Content Editor is. Users will be able to record video and upload it directly to YouTube safely. The feature provides the ability for faculty and students to record a video on the fly using a webcam and have it seamlessly embedded in course materials, interactions, and feedback through the content editor and reuse previously recorded videos by choosing from one’s own “library” of videos. All you need is Blackboard a webcam.
    Video Everywhere
    Video Everywhere
    For more information regarding Video Everywhere is available here.