Wednesday, December 05, 2007

How to Download your Blackboard Grade Center

You may download the Grade Center so you will have an offline copy to view and manipulate in Microsoft Excel or similar program.  We recommend downloading your Blackboard Grade Center occasionally so that you will have a local backup copy.

Here's how to download the Grade Center:

1. In your course, click Grade Center > Full Grade Center


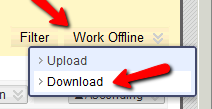
2. Click the "Work Offline" button > Download


3. Leave the defaults as they are and click the "Submit" button

(Screenshot: http://screencast.com/t/n3EyA8Qc4x)


4. Click the Download button.  This will tell your browser to download the file.


5. Note where you are saving the file on your computer, and click the Save button.

After your browser downloads the Grade Center file, you may open the file for viewing on your computer using Excel or a similar spreadsheet program, or the text editor of your choice.

If you make changes to the values in the spreadsheet, you may upload it back to the Blackboard Grade Center as well.  See Uploading Grades to the Grade Center from a File.


Wednesday, October 17, 2007

How to Upload a Document to the Discussion Board

Step 1 - Open the Discussion Board

Access the Discussion Board by clicking on the Discussion Board link located in the navigation pane on the left side of screen in your Blackboard course.


Step 2 - Upload your Document

Click on the title of the Discussion to open it


Click on Add New Thread


Enter a Subject and a Message (description) for your post.


Scroll down and click on the Browse button.


Browse to your file by selecting the Destination.


Next, select your document by clicking on it


Click Open.


Click Submit


If you have successfully uploaded a document to the Discussion Board, you will see a paper clip icon next to the subject of your post.


Friday, October 12, 2007

Version of Java for Chat and Virtual Classroom in Blackboard

If you're using the Chat or Virtual Classroom options in the Collaboration section of Blackboard, we recommend version 5.0 of the Java plugin for your browser for both students and instructors. Newer versions (such as version 6.x) have been known to cause problems with collaboration sessions.

You can download the version 5.0 of the Java plugin for Windows here:

http://www.ats.neu.edu/blackboard/java/jre-1_5_0_12-windows-i586-p.exe

(for Macintosh, please use the built-in java capability of your browser)

Tuesday, September 25, 2007

How to add a Wiki to your Blackboard course

Wikis are shared web spaces (web pages) that students and instructors can post material to and edit together collaboratively.

As the instructor, you can decide who in your class is allowed to edit and add content to a Wiki, and which participants in the class are allowed to view the wiki. You can use a Wiki to have students collaborate on a document, do a team project, produce a group report, or any other exercise in working together.

Here is how to add a Wiki to your course site in Blackboard:


Step 1 - Choose a content area

First toggle Edit Mode at the upper right of your course to "on"


Click a content area in your course menu on the left in which you would like the Wiki to appear (you could choose "Course Material" or "Documents" for example).


Step 2 - Add the Wiki

Use the "Add Interactive Tool" button and click on "Campus Pack Wiki".


Choose "new" Wiki and click the Submit button.

Give your Wiki a title and choose grading options:


Step 3 - Add a page to the Wiki

Use the "Add New Page" button to add the first page to the Wiki.  Use the "Permissions" settings at the top to decide which of your students or groups will have access to the Wiki to edit and/or view.


Step 4 - How students can edit the Wiki

The Wiki will appear in your course under the section you chose in step 1. View or edit the Wiki, students click the View link


If they have permission, students can edit the current page of the Wiki by clicking "edit" on the right side of the page. They can add a new page to the Wiki by clicking "Add New Page".


That's all there is to it. Your Wiki is now ready to use.

Tuesday, August 28, 2007

How to add a Blog to your Blackboard course

Blogs are journal-like web spaces that students can post material to. As the instructor, you can decide who in your class is allowed to post content to a blog, and who is allowed to read the blog. You can use a Blog to have students post a journal, upload files, upload homework, text, pictures, or even sound files.

Here is how to add a Blog to your course site in Blackboard:


Step 1 - Choose a content area

First toggle Edit Mode at the upper right of your course to "on"


Click a content area in your course menu on the left in which you would like the Wiki to appear (you could choose "Course Material" or "Documents" for example).


Step 2 - Add the Blog

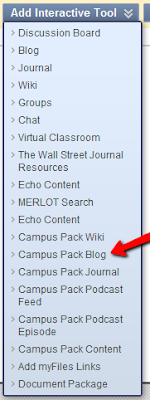
Use the "Add Interactive Tool" button and click on "Campus Pack Blog":


Choose "new" Blog and click the Submit button.

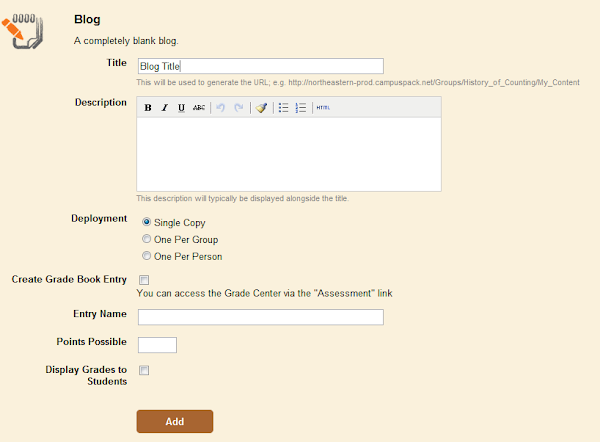
Give your Blog a title and choose grading options:


Step 3 - Add an Entry to the Blog

Use the "Add New Entry" button to add the first entry to the Blog. Use the "Permissions" settings at the top to decide which of your students or groups will have access to the Blog to make entries and view it.


Step 4 - How students can access the Blog

The Blog will appear in your course under the section you chose in step 1. To view or add entries to the Blog, students click the View link


If they have permission, students can add entries to the Blog by clicking "Add New Entry" on the right side of the page.

That's all there is to it. Your Blog is now ready to use.

Friday, August 24, 2007

How to Clean Up/Edit Your Course List in Blackboard

If you've had many courses in the past, you may have a large list of courses in the My Courses module on the front page of Blackboard.

Here is a quick way to reduce the clutter and make it easier for you to find current courses more quickly:

1. Log in to Blackboard.

2. On the Home tab, you will find the "My Courses" module.

Hover your mouse at the upper-right corner of the module, and click on the gear-shaped icon that appears.


3. The Customize My Courses screen appears. You will notice a list of your courses with a series of check boxes to the right of each.

4. Uncheck the boxes in the "Select All" column for the courses you want to remove.


5. Click Submit when you are done.

If you prefer to have all your courses listed in the My Courses module, but need an easy way to distinguish between courses by term, check the box in Display Course ID column. When you go back to the My Courses module you will see the Course ID listed next to the name. The Course ID includes a four (4) character suffix that designates its semester and year (e.g. fl09 = Fall 2009, sp08 = Spring 2008).

If you ever need to see a list of all your courses (e.g., you need the Course ID when requesting a new course), you can always see this by clicking on the Courses tab at the top of the screen. Here you will see a complete list of your courses.


How to completely remove your course from Blackboard

If you want to remove (archive) your course from the site completely, fill out the following form:

-> http://www.ats.neu.edu/blackboard/requests/delete

Your course will be deleted (archived). If you wish to have it restored at a later time, send a request to help@neu.edu.

Wednesday, July 25, 2007

How to download many files at once from Blackboard

If you are using the Firefox browser, there is a solution which will allow you or your students to download all the files in a Blackboard folder at once (without requiring access to the Blackboard Control Panel)

Instructors often post many files in folders in their Blackboard courses. For students, the usual way of downloading these files is by clicking the links one at a time. To speed up this process, there is a plug-in for the Firefox browser called "DownThemAll!" that will go through all the links on a page, let you check the ones you want, and download all of them at once.

This plugin works well with Blackboard.

Using your Firefox browser, get the plug-in here:

-> https://addons.mozilla.org/en-US/firefox/addon/201


Here is a picture of "DownThemAll!" in use:


Note: For the Blackboard site, we recommend setting DownThemAll to download each file sequentially. Do to so, in Firefox, go to Tools > DownThemAll > Preferences and set "Max contemporary downloads" to 1. (Thanks to Colin for this tip)

For more instructions on how to use "DownThemAll!" see the developer's website here:

http://www.downthemall.net/howto/features

Wednesday, May 09, 2007

How to configure Blackboard and Internet Explorer 7 for Windows Vista

Blackboard recommends these steps to enable Blackboard to run under Internet Explorer 7 in Windows Vista:

Set blackboard.neu.edu as a "trusted site" in Internet Explorer as follows:

1. Open Internet Explorer 7
2. If the menus do not appear at the top, press and release the ALT key on the keyboard to display them
3. Select Tools menu / Internet Options
4. Under the Security tab, click Trusted Sites and then the Sites button
5. Uncheck the "Require server verification" checkbox if it is checked
6. Type "http://blackboard.neu.edu" in the "add this website" box and click the Add button
7. Click Close and OK

Set the Visual Text Box Editor to Unavailable in Blackboard as follows:

1. Log into Blackboard at http://blackboard.neu.edu
2. Click the "Personal Information" link directly below the Home tab in Blackboard
3. Click the "Set Visual Text Box Editor Options" link
4. Click Unavailable
5. Click the Submit button on the lower right

The plaintext text box should now function under Vista.

Monday, April 23, 2007

How to Create a Turnitin Assignment

Creating a Turnitin Assignment is as easy as creating a regular Assignment in Blackboard. Turnitin Assignments have the advantage of automatic plagiarism detection. They accept a limited set of text-based file types from students (see File Types note below).

Here are the steps to add a Turnitin Assignment to your Blackboard course:

1. In your course, toggle Edit Mode at the top right to "On".


2. Click the area on the left side in the course menu into which you want to post the Turnitin Assignment (e.g. the "Assignments" section)


3. Select "Turnitin Assignment" from the "Assessments" button:


4. Select the assignment type.  The most common is "Paper Assignment", for which the students can submit a paper.


5.  Set the assignment title, point value, and start/due dates options for your assignment. The "post date" is the date that grades and comments are available to students in the "Grademark" feature and should be set for a date later than the due date. Click the Submit button at the top to post the assignment:


6. Click Submit, and OK.


Student Access

Students can access your assignment by going to the content area in which you posted the assignment and clicking the "View /Complete" link:


Instructor Access


You can collect the students submitted work and view their papers and plagiarism reports by going to the Course Tools > Turnitin Assignments link in your Control Panel. You can also access the papers via the entries in Control Panel > Grade Center > Full Grade Center


A Note About File Types:

Turnitin currently accepts the following file types for submission. 


More Turnitin Resources / Tutorials for instructors:


(1) Video showing how to add a Turnitin Assignment to your course: http://j.mp/neu-bb-create-turnitin-assignment-video

(2) Video Tutorial: how to check for plagiarism by viewing an Originality Report: http://www.youtube.com/watch?v=wUrTo-0RoHM&hd=1

(3) Video Tutorial: how to use Grademark: http://www.youtube.com/watch?v=r9_mmowfEDo&hd=1

(4) Video Tutorial: how to use Peermark: http://www.youtube.com/watch?v=N8sDMaGfw9I&hd=1


.


Thursday, March 15, 2007

What's New in Blackboard version 7

Blackboard version 7 is available at blackboard.neu.edu


Version 7 contains everything you are familiar with from previous versions of Blackboard, with select new enhancements. Please see links below for tutorials and demonstrations of the new features!

Key new and improved features include:

  • Multi-Language Support
  • Completely new Discussion Board
  • Adaptive Release improvements
  • Review Status improvements
  • Built-in Syllabus Builder
  • Performance Dashboard improvements
  • New Advanced Assessment Questions
  • Download Assessment Attempts that Include All Questions
  • Randomized Multiple Choice Answers
  • Advanced Course Menu and New Course Map
  • Changes to Import, Export, Archive and Restore Functionality
  • Course Copy changes for Course Cartridges
  • Additional Course Content Types - Wikis, Blogs, Podcasts
  • Additional Tutorials


Multi-Language Support by Institution, Course and User

Institutions can run multiple languages (or locales) on the same system. Institutions can offer the Blackboard Academic Suite in Spanish, French, Italian, German, Dutch, and Portuguese. The entire system can be set in a specific language, or a language may be offered as a preference for users. To support cross-border education, as well as foreign language courses, Instructors can set the language of the course independently from the language setting of the overall system.

Click for tutorial


New Discussion Board

The Blackboard Discussion Board has been completely re-written. The new Discussion Board enables threaded, asynchronous discussions, which can be subscribed to (you can choose to receive an email when someone posts a new message). Instructors can set up multiple forums around different topics and embed those forums in appropriate content areas or lessons. Instructors can determine whether students can moderate, modify, delete, post anonymously, include attachments, and other options. Forums can be sorted/viewed by thread, author, date, or subject and are completely searchable. Discussions can be graded for a participation grade and also peer rating may be enable as well. Lastly, there are specific statistics that report on each user’s participation level.

Click for tutorial


Adaptive Release


Course content does not always apply to all users in the course. Using Adaptive Release, Instructors can display content to certain users for a limited period of time, or only after users meet (or fail to meet) predetermined requirements. Some content might be applicable to all users in the course, while other content should be audience-specific.

Adaptive Release allows an Instructor to create custom learning paths through course content and activities. Content items, discussions, assessments, assignments, or other activities can be released to Students based on a set of criteria including: date and time, specific users, group membership, grades or attempts on a particular test or assignment, or Review Status of another item in the course. Instructors create and modifiy Adaptive Release rules from the new Manage page available on all content items.

Click for tutorial


Review Status

Outcomes-based tracking is an important feature to most Blackboard clients. Today, Instructors can track item hits on a user-by-user basis, but Students have no automated way of explicitly notifying Instructors when they review an item. If Review is enabled for a content item, users see a Mark Reviewed icon from the course view. When users have completed their review of the item, they click the Mark Reviewed button. The item then displays a Reviewed icon. The Instructor can view progress from the Performance Dashboard or the User Progress page in the Control Panel. Instructors enable and disable review from the new Manage page available on all content items.

Click for tutorial

Syllabus Builder

The Syllabus Builder is an easy-to-use content item that makes Syllabus creation—the most basic element of any course—simple for Instructors of all levels, with a feature that allows them to easily apply designs to their work. Syllabi can contain general class information such as dates and times as well as an overview of each lesson.

Instructors create a syllabus by selecting Syllabus from the action bar dropdown menu on a Content Area page.

Click for tutorial

Performance Dashboard

The Performance Dashboard is a course tool that allows Instructors to see key information and outcomes for all course users. It displays the last time users logged in, their course role, content availability by user based on Adaptive Release criteria, Review Status for content items, and a direct link to the Gradebook: User Grade List page for individual users.

Click for tutorial

Advanced Assessment Questions

When creating Assessments in the Blackboard Learning System, Instructors may choose from ten additional question types, including: Calculated Questions, Numeric Response Questions, File Response Questions, Hot Spot Questions, Multiple Fill-in-the-Blank Questions, Jumbled Sentence Questions, Opinion Scale Questions, Short Response Questions, Either / Or Questions, and Quiz Bowl Questions.

Click for tutorial

Download Assessment Attempts that Include All Questions

Instructors can download Survey or Test attempts as a .CSV file. Most often, this feature is used to perform statistical analysis in a spreadsheet application, such as Microsoft Excel. Downloaded Assessment attempts now include all questions in the Assessment. In earlier versions, only certain question types, such as Multiple Choice, were included in the downloaded attempt.

Randomize Multiple Choice Answers

Instructors have the option to randomize the answers in multiple choice questions. The answers are randomized for each assessment attempt, which helps prevent Student cheating.

Click for tutorial

Advanced Course Menu and New Course Map

Two views of the Course Menu are now available to users: the Quick View (the original menu design) and the Detail View. The Detail View is the full Course Map, letting users expand and collapse the Course Menu, and displays a clickable link to each item in the course. If allowed by the Instructor, users may toggle between these two views.

In addition, commonly used tools are separated from the Course Menu to make them easier to find and use. To support the advanced Course Menu, the Course Map has been redesigned. It displays new icons based on the item or tool, shows only the content available to the current user (based on Adaptive Release critieria), and loads very quickly even in large, content-rich courses. The map is cached for even faster rendering in subsequent views and has a 20 minute automatic refresh.

Click for tutorial

Changes to Import, Export, Archive and Restore

In Blackboard Academic Suite (Release 7) the import, export, archive and restore processes are asynchronous. This means that users do not have to wait in the browser

window while the operation takes place. This is more efficient for users because the operations are queued and managed in the background. When one of these tasks is executed, the system completes it in the background and sends the user an email upon completion. The new process for Export and Archive matches the process for Course Copy. The new Export / Archive Manager, available on the Control Panel for individual courses and organizations, makes it easier for users to manage these operations. This page lists all of the packages that have been created for the course, including detailed logs

for the package processes. The user can export and archive the course multiple times and keep multiple backups of the course. The user may also remove packages that are no longer needed.

Course Copy changes for Course Cartridges

The Copy Course Materials into a New Course and Copy Course Materials into an Existing Course features now include an option to include protected Course Cartridge content. Instructors and Administrators can choose whether or not they would like to include cartridge content in the copy operation. If this option is selected, the content may be accessed in the copied course by users with a valid Student Access Key. When copying course materials into an existing course, the system will check to confirm that both courses contain the same Course Cartridge. If they do, the selected course

sections will be copied including any protected Course Cartridge content. If the courses contain different Course Cartridges, only non-Cartridge materials will be copied and the user will be given a message stating there was a Course Cartridge conflict.

Additional Course Content Types (Wikis, Blog, Podcasts)

Instructors may add a number of different kinds of content to course Content Areas; these are referred to as Content Types. Additional Content Types (i.e. Discussion Board, Groups, Tools) have been added to the drop-down list of a Content Area page in Bb 7. Wikis, Blogs, and Podcasts can be added to courses.

How to add a Wiki to your course
How to add a Blog to your course
How to add a Podcast to your course


Additional Tutorials

This is the blackboard website that provides links to these tutorials as well as additional ones.

Blackboard Tutorials

Tuesday, March 06, 2007

How to Podcast using Blackboard

How to Podcast from Blackboard in four easy steps*:


1.  First toggle Edit Mode at the upper right of your course to "ON"


2.  Click a content area in your course menu on the left in which you would like to add a Podcast link, such as the "Course Material" section. Click the "Tools" button, then click "Campus Pack Podcast Feed"


Type a title for the new Podcast and click the "Add" button


3.  Add new content to your Podcast by adding new "episodes".  To add a media file, click the "Add New Episode" button.


Give the episode a title and click New Episode


You can record a new episode live (Record Media), upload a file from your computer such as an MP3 audio file (Upload Media), or link to an external file using a URL (Link to External Media).


Choose your method, record, upload, or link.  Optionally type a description of the episode, then click the Save & Exit button at the bottom.


4. Accessing your Podcast

In Blackboard, your students may access all of your podcast content by using the "View" link in the Content Area in which you added the Podcast.


They may also subscribe to your Podcast content using the Subscribe button under Settings or by using the RSS icon at the upper right.


Whenever you want to add more audio content to your Podcast, repeat Step 3 above.  The new content will be added to your course, and any students who have subscribed to your course Podcast will receive the new episode content automatically via email or their preferred RSS/Podcast player.


We hope this information is helpful.


*This method of Podcasting in Blackboard uses the Campus Pack Building Block from Learning Objects in Blackboard.  You must have this Building Block installed on your Blackboard system for this to work.


Thursday, February 01, 2007

How to use the Assignments feature to collect student work

Blackboard "Assignments" are a way to collect student documents and files in Blackboard.

Adding an Assignment item to a course allows an instructor to post instructions or a document, retrieve the completed assignment as another document or file from a student, and review and grade that assignment via the Grade Center. Blackboard also provides enhanced file management options, including bulk downloading and cleanup of these submitted items. The Assignment feature can accept any file type from students.


How to create an Assignment:

1. In your course, toggle Edit Mode at the top right to "On".


2. On the left of the course site, click on the name of the Content Area where you wish to add the Assignment, for example, "Assignments"


3. Click the "Assessments" button and then click "Assignment"


Give the Assignment a name, type or paste some instructions into the text box

You may add file attachments ("Assignment Files", such as lists of questions for students to answer, articles to read, presentations to review, maps or spreadsheets to analyze) using the "Browse My Computer" button.

Set options for Grading and Availability. You may set the "Number of Attempts" section to allow the students to submit more than once. The Grade Center will record and preserve all attempts.

4. Click the "Submit" button on the right to post the Assignment.


What the students see:

Students can view the assignment in the selected content area on the left side of the course.

They can look at the assignment and download any necessary documents the instructor has posted. After doing the work necessary to complete the assignment, students should click the assignment link (the name of the assignment is a link) to upload and submit their work. They may use the "Browse My Computer" button to find the files they want to submit, and they can also post comments about the Assignment in the text box. These comments will appear in your Grade Center. A student can submit multiple files for one assignment if desired, but students can only submit an Assignment once unless the instructor sets the assignment options to allow multiple submissions (see above, step 3).


How to view submitted Assignments (Grade Center):

Instructors retrieve and grade Assignments through the Grade Center, much like any other kind of assessment.

When a student submits an assignment, a green exclamation mark will appear in the student's cell in the Grade Center. Click the drop-down arrow and select "View Grade Details" or a particular attempt to review and grade the students attempt(s).


You may download all the students' papers at once by clicking the drop-down arrow to the right of the column heading at the top, and selecting "Assignment File Download":


Allowing Students to re-submit an Assignment

If a student needs to re-submit a single-attempt assignment, the instructor may manually reset the student's previous submission by clicking the drop-down arrow next to the exclamation mark that represents the student's submission in the Grade Center, and then clicking "View Grade Details" > "Clear Attempt" button.

Sunday, January 14, 2007

Tips for Deploying a Test in Blackboard

Click here for a video tutorial on how deploy online Tests in Blackboard.


Specific tips for deploying an online test/quiz in Blackboard

After you've created on online assessment in the Test Manager, you can deploy it into the content area of your course (e.g. "Assignments") by going to that Content Area in your course and clicking the "Create Assessment" button.

Remember, deploying an online test is not the same as a paper test. Here are some recommended settings to help eliminate potential problems when deploying a test in your Blackboard course. These settings can be found in the content area where you deploy a test (e.g. Control Panel > Assignments). Use the "Modify" button to the right of the test to open the "Modify the Test options" section.

Options:

Open test in new window - Make sure to keep this option set to No. If your student has their browser set to block pop-up windows, setting this to Yes could prevent the test from launching in their browser because the new window will be blocked by the pop-up blocker.

Allow multiple attempts - checking this option will allow the student to take the test multiple times. This is the best option when the test is a self-assessment. If it is a graded test, you will probably want to keep this option off so that they can't restart the test if they don't like their grade. Also note, whenever a multiple attempt is started, the previous attempt is deleted from the Gradebook. Only the most recent attempt is saved.

Force Completion - We do not recommend using this setting, because it can cause difficulty for students and does not effectively prevent cheating. When this is checked on, it removes the students' ability to exit and re-enter the test. This means the students must complete the test in the same browser session as when the test is initially launched. If the student closes her browser, her computer crashes, her Internet provider logs her off, etc., then she cannot get back into the test. In that event, the instructor has to make the decision as to whether or not to let the student take the test again by resetting the attempt in the Grade Center. Resetting the attempt clears out all the previously given answers and will force the student to start over.  An alternative to Force Completion is to use the "Timed Test" option and give the students a limited amount of time in which to complete the test.

Timed Tests - Instead of using the Forced Completion option to force students to take a test in one sitting, use the "Set timer" option instead. This setting records completion time for this Test. By setting the timer on and setting how long they have to take the test, you can see how long it took the student to complete the test, no matter how many times they may have accidentally closed their browser or been booted off.

You can force the test to submit automatically when the time limit is reached by turning "Auto-Submit" option ON.


Note: This will not allow students who need more time on a test to go over the limit.  If you would like to allow a student more time for a timed test, please see this article:
https://blackboardtips.blogspot.com/2011/10/how-to-allow-one-student-more-time-on.html

If Auto-Submit is OFF, Blackboard will not force a submission at the end of a timed test, but will warn the student when they have 1 minute left to submit the test themselves.  Students may go over the time limit, but if a student goes over the time allotted, they do not get an automatic score. Instead, they will get an exclamation point in the Grade Center instead, and the Instructor will need to go into the Grade Center manually grade the test, in case the instructor needs to deduct points for going over the time allotted.


Test Feedback - Sometimes an Instructor would like to only show the student their score during the time period the test is available, but then give them more detailed results once everybody has completed the test. This can be done by returning to the test options and changing the Test Feedback from the old setting to the new setting. When the student next goes to view their grades via Tools > My Grades, they will see the test results in whatever the current Test Feedback setting is.


Presentation Mode - There are many differing opinions on what option is better, All at Once or One at a Time. The "One at a time" setting forces activity on the server side of Blackboard, which can prevent problems with time-outs during test taking, especially for tests containing Essay questions that take a long time to answer.  The "One at a Time" presentation also forces Blackboard to save the students questions/progress as they move from question to question.

The "All at Once" presentation mode may be better for tests with small numbers of questions.  If you are presenting your test in "All at Once" mode, please recommend to your students that they click the Save button next to each question as they proceed through the test. This will immediately save their answer to that question in the Gradebook. Otherwise, if a student is completing a long test and gets booted from the test before completing it, all their answers may be lost. If they were clicking the Save button for each question as they proceeded through the test, the questions they already answered would still be saved.


Video demonstration: